Wednesday, November 6, 2013

Pre-Thanksgiving Dinner - Turkey Talk


About a month ago, I started craving my full-course Thanksgiving dinner.  Roast turkey, sausage stuffing, mashed potatoes and gravy, homemade rolls, cranberry sauce... ahhhh I love it.  Thanksgiving, in my opinion, is every home cook's, or chef's "Olympics".  If you're making the meal yourself, that is! 
 
So I started planning my "Fakesgiving".  I invited some friends over - because there is no way our little family of 4 could eat all the food I was about to prepare.  The next few posts will be entirely devoted to dishes for your Thanksgiving dinner!
 
Today, I want to talk turkey.  Years ago, I made my turkey using a Reynolds roasting bag.  It kept the turkey moist and it cooked quickly, but the look of the bird was something less than desired.  You don't get a beautiful crispy skin (which I love!) when you use the bag.  I had never brined my turkey before, either.  About 5 years ago, I tried it for the first time and oh my goodness... I won't ever not brine again.
 
Now you can spend a ton of money buying a bringing mix from Williams Sonoma or other places.  I make my own and really, you can make it however you want! It's easy, but you need to give yourself plenty of time to allow for this process - not just for the best results, but for safety reasons, too.
 
Fill the biggest soup pot you have with water.  If you don't have a big pot, then you'll probably have to do this twice or three times.  You'll need a gallon or two of brine to cover the entire bird.  In the pot, add 1 1/2 cups salt.  I use sea salt or kosher salt.  Then I toss in some crushed garlic cloves, a couple bay leaves, peppercorns, fresh rosemary sprigs, thyme sprigs, one orange sliced, one lemon sliced, 2 cups apple cider or apple juice, 1 cinnamon stick, and if you can find them, juniper berries.
Bring this to a boil.  When the salt is completely dissolved, turn the burner off and move the pot off the heat.  Allow this to cool completely and then put in the fridge.  Like I said, it's a long process.  I always start my brine in the afternoon, let it cool until bedtime, then put in the fridge overnight.
 
In the morning, I put my turkey in a brining bag.  If you can't find a brining bag, use one of those Reynolds roasting bags!  They work great!  Put the turkey in the bag, then place in a tub or roasting pan for easy transporting, and just in case you spring a leak!  Check to make sure you've emptied out all the of the cavities of the turkey - removing the neck and innards.  (Don't toss those - you'll want them to make turkey stock for the gravy!)  Carefully pour the COLD brine into the bag.  Removing as much air from the bag as possible, seal it up and pop the entire turkey into your fridge.  If you don't have room in your fridge, use a cooler and keep on ice so you don't get food poisoning.
 
Every 12 hours, rotate your turkey so all sides get evenly brined.  I brine my turkey for at least 2 days.  So if you do the math, that means you need to start three days before Thanksgiving for this whole thing to work.
 
The night before Thanksgiving, remove the turkey from the brining bag.  I put my turkey on a cooling rack on top of a cookie sheet.  You want your turkey to drain before you start roasting so you get a crispy skin.  Cover the turkey with saran or foil and put in the fridge for overnight.  In the morning, put your turkey in the roasting pan, rub with olive oil, and sprinkle with sage and thyme.  Pop into a 400* oven for about 25 minutes, then reduce to 325* and roast until your meat thermometer (stuck into the thigh - but not touching bone!) reads 165*.  Remove the turkey from the oven and let rest for 30 minutes before carving.

Wednesday, October 23, 2013

.fried chicken sandwich w/ jalapeno slaw.


I love burgers, but sometimes, I want something different.  This isn't necessarily lighter in calories, but it makes for a great alternative to throwing patties on the grill.  It works best if you have some kind of fryer to keep the grease mess minimal. (I have this one that I bought at Target.  It's awesome!)

JALAPENO SLAW
The first thing you want to do is make the jalapeno slaw.  I make this slaw all the time and everyone raves.  Don't let the name deceive you. It's not spicy at all, unless you want it to be.  What you get is a wonderful jalapeno flavor without much heat.  Here's what you need:

3-4 jalapeno, diced
1/2 head cabbage, finely sliced
1 large carrot, peeled and grated
1 small onion (or 1/2 medium), grated
1 cup mayonnaise
2 Tbsp sugar
2 Tbsp cider vinegar
salt and pepper
celery seed

*For more heat, keep the seeds and ribbing on the jalapeno and add to your slaw.  If you want virtually no spice at all, remove the ribbing and seeds before dicing.

Put all ingredients in a bowl and mix well.  Taste and adjust seasoning, as needed.  Keep refrigerated.

The slaw can be made earlier in the day, or even the day before.  It holds up great for days.

FRIED CHICKEN
You can grill a chicken breast if you want to make this lighter, but there's something about a fried piece of meat on a bun with that slaw on top that knocks it out of the park.

In a bowl, mix together 1 cup flour, 1 tsp salt, 1/2 tsp pepper, 1/4 tsp cayenne, 1/2 tsp garlic powder.  In another dish, scramble 2-3 eggs.  In a 3rd dish  mix together the same flour mixture we have in the first dish.  You could use the same dish for the flour if you want -- just double the ingredients.

Take 4 boneless, skinless chicken breasts and coat well with the flour mixture.  Dip in the egg, then back into the flour.  Set on a cake cooling rack that's placed on a cookie sheet.  When you've coated all the breasts, put in the fridge and let set for an hour.  This is VITAL to getting a nice crispy crust when it's fried.  If you don't give it enough time to sit, you'll have a soggy crust.

Heat your oil to 350*F.  When the oil is ready, carefully put each breaded chicken breast in and fry for 10 minutes.  Remove from the oil and sit on paper towels to drain. 

To serve, I put on toasted hamburger buns and add a generous helping of the jalapeno slaw on top.  Serve with fries or salad or whatever you want with it.  I think I'm going to convert a few new fans.  Enjoy!

Friday, October 18, 2013

.grilled garlic prawns w/ mango salsa and roasted poblano lime gastrique.


We had friends over for dinner to celebrate the husband's birthday.  We made it a four course meal with appetizer, salad, entree, and dessert.  This was the appetizer course and it was delicious and quite easy to make!  If you're looking for a showstopper dish at a party, or if you just want to fancy up your dinner, I really recommend you try this recipe.
 
 
NOTE:  The gastrique and salsa can and should be made ahead of time so they're ready to go once the shrimp is grilled.
 
 
SHRIMP
Put your prawns in a large Ziploc and drizzle in a little olive oil.  Add TONS of minced garlic, 2 tsp garlic powder, 1 tsp kosher salt, and 1/4 tsp pepper.  Let marinate all day, or overnight.
 
 
ROASTED POBLANO AND LIME GASTRIQUE
2 poblano peppers, roasted, peeled and seeded
2 limes, juiced
2 Tbsp olive oil
1 shallot, finely minced
1/2 cup white wine
1/2 cup white vinegar
1 cup sugar
4 Tbsp butter
Put the peppers and lime juice in a blender and puree until smooth; set aside.
In a saucepan, heat the olive oil.  Saute the shallot for a minute, stirring once or twice.  Add the pureed poblano, the white wine and vinegar and sugar.  Bring to boil and allow to reduce by half.  It will become syrupy.  Remove from the heat and add 1 Tbsp of butter at a time, mixing as it melts to incorporate into the sauce.  Set aside.


MANGO SALSA
1 mango, diced in small pieces
2 red bell peppers, roasted, peeled, seeded, and diced
1 bunch green onion, thinly sliced
2 Tbsp cilantro, chopped
1/2 lime, juiced
Combine all ingredients and mix well.  Set aside.
To plate:  Spoon a layer of gastrique on the bottom of your dish.  Place your shrimp and then top with the mango salsa.  Drizzle with a little more gastrique.  Serve immediately!

Printable recipe

Monday, October 14, 2013

.barley beef soup.


The weather here in New York has been relatively nice this month.  Typically we're cooling down and I start wanting things like soup, stew, casseroles; so you can imagine my culinary winter "appetite" is confused.  While at the store this week, I picked up the ingredients to make barley beef soup and here it is .. a 70 degree day and I'm making it.  Shoot.  I even made homemade rolls.  Go me!

Barley is a grass, like wheat.  Barley is used in making beer, soup, it can be ground to make bread, etc.  It has many uses.  I learned all of this on Wikipedia and my oldest daughter was happy to read that it grows in the Fertile Crescent of northern Africa (aka Egypt).  (She's learning about the Fertile Crescent in school right now!)

This is a soup I cook in my Dutch oven and let it go all day in the oven at 250*.  My husband asked me today why I didn't use my crockpot and I informed him that 1) I destroyed my crockpot insert when I attempted to make overnight steel cut oats (oops!); and, 2) nothing EVER turns out in my crockpot.  It's even one of these nice ones and I have this great disdain for the dang thing.  So, I stick with my method of just letting it go low and slow for hours and hours.

Here are the ingredients you'll need:

2-3 lbs stew meat, cut into bite sized pieces
2 cloves garlic, minced
1 large onion, diced
2 cups carrots (I buy the bag of baby carrots and cut them in half)
5-6 medium sized white or gold potatoes, peeled and diced
3 stalks celery, chopped
3/4 cup barley
2 Tbsp tomato paste
2-3 cups beef broth
2-3 cups chicken broth
1/2 tsp sugar
bay leaf
fresh thyme
Italian parsley
salt and pepper
oil

Season the meat with salt and pepper.  Heat some oil in your Dutch oven or skillet and fry up the meat.  Sear.  Remove and put on a plate or bowl; set aside.  Heat a little more oil in the pot and sauté the garlic and onion for about 30 seconds.  Add carrots, potato, celery, and bay leaf.  Saute until the potatoes get a little glossy on the outside.  Return the seared meat to the pot and add barley, broth, sugar, herbs, and a little salt and pepper.  Pop the lid on and put in your pre-heated oven.  Let cook for 4-5 hours. 

Because I use stew meat, the long cooking time helps to break down the fat and sinew resulting in the most amazingly tender beef you'll ever have in your life, so don't be tempted to rush this dish.

This makes a big pot of soup so you'll have plenty of leftovers (if you're a family of 4, like us) or you can freeze half for a later meal.

I always serve this soup with homemade dinner rolls.  Enjoy!

Printable version

Friday, August 10, 2012

.chicken curry.


My husband's birthday was earlier this week so I've been making dinners that I know he loves to give him a "week of Jim" sort of birthday.  He retired from the Navy in 2008 and I remember him talking fondly of the curry dishes he would have whenever he deployed.  I have experimented many times making curry.  Most were good, but not exceptional.  I was looking for real, authentic flavors and heat and I think I've nailed it this time.

There's an Indian grocery in Poughkeepsie that I pass all the time so I decided to stop in there last week to see what I could find to make my curry.  They had a couple varieties of curry powder.  I picked up some Hot Madras curry powder, Indian red peppers (they look like little tiny super skinny red jalapenos), and fresh curry leaves! 

Begin by heating a dutch oven, or a skillet - whichever you have.  Heat over medium high heat and add some oil -- preferrably ghee.  Season chicken thighs and legs with salt and pepper and sear in the heated oil.  Once they're beautifully browned on both sides, remove and set aside.

You shouldn't need any oil as the fat from the chicken has rendered into the pan.  Add the following aromatics and vegetables in the heated pan:

3-4 cloves garlic, crushed
1 1/2 to 2 onions, halved and sliced
4-5 Indian red peppers
5-6 curry leaves
1 red bell pepper, chopped
2 cups red or gold potatoes, large cubes
2 cups carrots (I use the little mini snack sized carrots and leave them whole or if they're really big, cut them in half)

Saute all of these vegetables together for about 5-10 minutes.  When the onions begin to wilt and become transparent, season with salt and pepper.  Sprinkle the top of the vegetables with curry powder (I used quite a bit to get lots of flavor in there) and half cup flour.  Stir everything up and continue to cook for about 5 minutes.

If you're using a dutch oven, return the chicken to the pot.  If you aren't, put your vegetables in an oven safe baking dish (that has a lid, perferrably -- or seal tightly with foil).  Top the veggies with the chicken.  *Note:  I also largely diced one tomato and put those on top before putting in the oven. 

Add 1 can coconut milk and 2-3 cups chicken stock -- enough to almost cover everything in the pot.  Cover with lid or foil and pop in a preheated 300* oven.  Let this cook for 2 1/2 to 3 hours.  This dish can also be made the day before and reheated.  The flavors will be amazing the following day!

Serve over cooked rice.  Enjoy!

Wednesday, July 25, 2012

.southern caramel cupcakes w/ candied pecans.


I don't know many people who don't love cupcakes.  These individual serving sized treats are perfect for someone who would like to splurge a little, but not overindulge.

I make cupcakes whenever I go to my scrapbook weekends.  I take two varieties and these deliciously moist, Southern Caramel Cupcakes were the ones I took just recently to a crop.  A light, buttery cake topped with homemade caramel and a candied pecan.  Could you get any more southern than that?

These take time to make -- at least, the caramel does.  So make sure you give yourself ample time.  Whomever you make these cupcakes for, they will love you for it!  Enjoy!

Butter Cake

1 cup (2 sticks) butter, softened
2 cups sugar
4 eggs
1 Tbsp baking powder
1/2 tsp salt
3 cups cake flour
1 cup milk
1 tsp vanilla

Cream butter and sugar until smooth.  Add eggs, one at a time, mixing well between each addition.  Your batter at this point will be really light and fluffy. 

In a bowl, mix together all your dry ingredients.   In a measuring cup, put your milk and vanilla.

Alternating, add some dry ingrediens and then some of the wet.  Do this until all has been added and mixed in.  Your batter should be slightly thick, but fluffy like frosting.

Using a large cookie scoop, scoop your batter into paper lined muffin tins.  Bake at 350* for approx 15 minutes.  When a toothpick inserted comes out clean, remove from the oven and dump onto a cooling rack.  Cool completely.


Homemade Caramel Topping

In a large, heavy bottomed pot, put 4 cups sugar and 1 cup butter (cut up into pieces) and cook over medium heat until the butter is melted and the butter/sugar begins to turn a caramel color.  (Approx. 10 minutes)

When the sugar turns a deep amber, add 2 cans evaporated milk (Pet brand preferred) and 1 tsp sea salt (no substitutions).  Whisk until smooth.  It might take a few minutes, but as the milk heats up, the sugar will dissolve.

Clip a candy thermometer to the side of the pan and lower the heat a smidge to medium low.  Cook, stirring occasionally, for 2 1/2 to 3 hours.  When your candy thermometer reaches 245*, pull the pot from the heat and add 1 tsp vanilla.  Mix in well.

If you have a stand mixer, pour the hot caramel into your mixing bowl and using the paddle attachment, beat on slow for 30 minutes, or until the caramel becomes thick and is spreadable.  Let sit again for 30 minutes.

Spoon some caramel onto each cupcake.  Using a knife or small offset spatula, spread the caramel around to cover the surface of each cake. 

*NOTE:  Do not let this caramel sit too long otherwise it will set up too much and won't spread out as easily - and you could pull up the top of your cake. 


Candied Pecans

Put 2 cups pecan halves in a skillet and add 1/2 cup sugar.  Over medium heat, keep stirring the pecans and sugar around until the sugar melts and coats the pecans.  It will turn an amber color like the caramel.  When it does, remove from the heat immediately and dump the coated pecans onto a piece of foil or on a baking sheet lined with parchment.  Sprinkle lightly with sea salt.  Allow to cool, then break up into pieces. 

*NOTE:  These can be made up days in advance.  Store in an air-tight container until ready to use.

Thursday, July 19, 2012

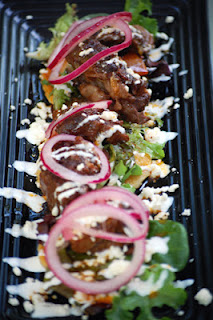
.chile-rubbed short ribs w/ sopes, greens, & pickled onions.


I love short ribs, but whenever I make them, I always go to my go to recipe with tomatoes, red wine, Italian herbs and all that good stuff.  It's always an Italian dish!  I decided to try something new.  While searching around the internet, I came across a recipe for chile rubbed short ribs, which gave it a more Latin/South American flavor.  Something I definitely wanted to try. 

With short ribs, you need to make them well ahead of time.  They take 4 hours to braise in the oven to ensure the sinew has broken down and for the fat to render completely.  Do it properly, and you'll have a finished product that's juicy and tender and mouthwateringly delicious!

There are a lot of components to this dish and while it may look awfully fancy in my picture, it's really not.  In fact, I would even consider this dish something a beginner could easily make.  So if you're feeling intimidated, don't! 

Step 1:  SHORT RIBS

Put chile powder and salt in a bowl (2:1 ratio).  Generously coat all of the short ribs and set aside.  If you can, do this step the night before so they can soak in all that smoky chile flavor.

Put some oil in a large dutch oven and heat over medium high heat.  When hot, put in your short ribs and sear all sides of the pieces.  If all of your short ribs didn't fit in the pan, sear some and then put them on a plate.  Repeat searing the remaining ribs.  Place all seared ribs back into the dutch oven. 

Add to your pot:

1 1/2 cups red wine (a good Spanish wine would be fantastic for this)
4 cloves crushed garlic
1 Spanish onion, sliced
1 lime, cut in half, squeeze juice into the pot and drop the lime into the pot
5-6 sprigs fresh thyme
1 can green chiles, diced
2 tomatoes, diced

Put the lid on and pop this into a preheated 250* oven.  Cook for 4 hours.

Step 2:  PICKLED ONIONS

Peel and thinly slice 1 red onion.  Put in a large ziploc with 1/2 cup warm water, 1/4 cup cider vinegar, 1 Tbsp sugar, and 1 tsp salt.  Seal up the ziploc, removing as much air as possible.  Pop in the fridge and let sit.  This step can be done a day in advance to give your onions more time to pickle.

Step 3: SOPES

Sopes are these lovely little fried corn pancakes.  They have a hint of sweetness that pairs well with the robust short rib.

In a bowl, mix together 1 1/2 cups masa (I used Maseca), 1 tsp salt, and 1 Tbsp salt.

In a saucepan, put 2 1/2 cups milk and heat to boiling.  Once boiling, turn off the burner and add 1/4 cup butter, cut into small pieces.

When the butter has completely melted, pour the hot milk into the dry ingredients and whisk until combined.  Let sit for 5 minutes for the masa to absorb the liquid.

If you have an electric griddle, use it.  If you don't, you can use a skillet over medium heat.  Heat your griddle to 350*.  Drizzle the hot griddle with oil or melted butter.  Use a 2 Tbsp cookie scoop and scoop blobs of batter onto your griddle surface.  Take a metal spatula and carefully press down each blob to make a little pancake.  (I did have to coat the back of my spatula with some butter so the dough wouldn't stick to it.)  Cook for 6 minutes on each side.  When they're golden brown on both sides, remove and set aside.  Repeat until all the batter is cooked up.

Step 4:  PLATE!

When all of your steps are done, it's time to plate.

Begin by placing your sopes down first.  I used spring greens and layed them down on top of each sope.    Then I put a piece of short rib meat on top of that!  Crumble a little Cotija cheese on top of that, then drizzle with some Mexican Crema.  The final step is placing some of those pickled onions as the garnish.


Voila!  So simple.  So SO delicious.  Your family will be amazed by your mad culinary skills!  Enjoy!