 My daughter, Paige has been bugging me for awhile now to make caramel apples and I thought today would be a great day to do this as a family. This caramel recipe is one I've made for years. It's from a cookbook I bought back before I even met my husband (we're talking 1992 folks. lol) and I have posted quite a few recipes from it here on the blog. The cookbook is by Land O Lakes called Treasury of Country Recipes. Love it.
We're big fans of apple and caramel here but I wanted to up the wow factor by making these like those mammoth numbers you find in candy/chocolate stores by adding chopped peanuts, toasted coconut, mini chocolate chips, and crushed oreo cookies. Seriously.. say it with me. "WOW!"
First we need to make the caramel.
In a large saucepan put 1 cup (2 sticks) butter, 1 cup firmly packed brown sugar and 2 cups sugar.
Add 1 cup cream and 1 cup milk.
Add 1 cup light corn syrup. [NOTE: A tip when you measure this. Spray the inside of your measuring cup with pam spray and it will slide right on out. This tip works just as well with molasses and honey too.]
Put the pot on low heat on the stove.
This is what the caramel will look like after an hour. A little frothy on top and it will be bubbling slightly.
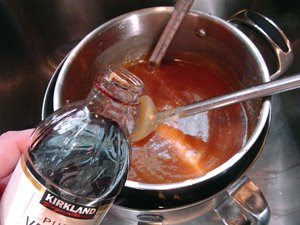
Candy is not something that can be rushed. This caramel takes almost 2 hours to make. You want to bring this to 248* F (120* C). Don't go past that temp otherwise your caramel will be too far into the hard ball stage. When it finally reaches temp, remove from the burner and put in bowl of ice water. We need to cool this down a little (to 175*) before we dip the apples. Add 1 tsp vanilla.
While the caramel is cooking, prep your toppings. I crushed oreo cookies, chopped up some unsalted peanuts, opened a bag of mini chocolate chips, and toasted some coconut. Put each topping in their own bowl and set aside.
You're also going to need to melt some chocolate. I used a bag of 60% cocoa Ghiradelli chocolate chips. Put in a double boiler and melt on very low heat. Stir until completely smooth. Remove from heat.
Now if you've ever made caramel apples in the past, did the caramel slide right off the apple? The reason for this is because commercial growers put a wax coat on the apples to give them a nice shine, and also to keep them fresh longer and keep bugs off. So, what we need to do is remove the wax.
Bring some water to boil and dunk the apples in for just a minute. Put them in an ice bath and dry well. I also take a mesh scrubber that I clean my fruit and veggies with to scuff the skin. This will give the caramel something to grab onto.
Once you have cleaned the apples, remove the stems and shove craft sticks into the midde.
Something else I like to do but didn't have time to do today was put these in the freezer for about 30 minutes. This gets them nice and cold so the caramel sets almost immediately and keeps a lot from sliding off.
Dip the apples in the caramel, tilting the pot if necessary to get full coverage.
We had some pretty big apples and so I needed to help Paige out to get the tops coated.
Place the coated apples on a silpat or waxed paper. Put in the fridge or freezer to set.
We need to add another coat of caramel. So after the first coat has set, dip again. Now it's time for the fun stuff!!!
Sprinkle whatever toppings you like on your apple. Tilt here and there so you get the sides.
Return the apples to the fridge to set again. After a few minutes, pull from the fridge and drizzle with some melted chocolate. and sprinkle even MORE toppings on! Oh yahhhh!
Here is the monster caramel apple after it's all done. Pop the baby in the fridge or freezer again to set the chocolate.
Once it's firm, carefully pull from the waxed paper and enjoy!
Friday, October 31, 2008
.caramel apples.
Subscribe to:
Post Comments (Atom)


1 comment:
Those look amazing! Yum!
Post a Comment