Tuesday, July 12, 2011

.garlic thyme chicken pasta with cream sauce.


I feel that lately we've had a lot of mexican and asian style food in our house the past couple of weeks. I adore pasta, but pasta is no good for my insulin resistent body so I have been trying to not fix/eat it much.

This is a quick dish to make and relatively easy. If I had to give it a star rating, I would give it a 2. From start to finish, it'll take about 45 minutes to make and is super duper delicious.


  1. Begin by taking chicken thighs and season with salt and pepper. I used thighs because we like dark meat, but you could use chicken breasts, legs, or whatever your favorite part is.

  2. Heat a skillet over medium to medium high heat. When hot, add about 2-3 Tbsp olive oil. You don't need a lot because the fat from the thighs will cook down and add to the pan.

  3. Placing the thighs in the pan, skin side down, fry for about 4 minutes per side. We want to sear the chicken so that it will retain all that juicy goodness. When you flip the chicken over, toss in some fresh thyme and crushed garlic cloves to the pan. Spoon the rendered fat over the chicken for a minute then let sear on the other side 4 minutes.

  4. Remove from the pan and put in a baking dish. Spoon a little fat over the top, and make sure you put those garlic cloves and thyme on top of each piece of chicken. Pop in a 350* oven to finish cooking through.

  5. While the chicken cooks in the oven, begin cooking the pasta. I used linguine, but you can use spaghetti or fettuccine. Linguine takes approx 10 minutes to al dente. When done, dump into a colander and shake off the excess water. Return to the pan.

  6. While the pasta is boiling, make the cream sauce. We're going to use the pan we seared the chicken in. Heat the pan back up over medium heat and add a Tablespoon (or two) of olive oil. You'll probably need to dump out the chicken fat first. When the olive oil is heated, saute 1-2 shallots, minced and 2 cloves garlic, minced. Saute for 30 seconds to release the fragrance. You don't want the shallots and garlic to burn so make sure you keep an eye on it. Add 3/4 c. chicken stock and 3/4 c. white wine to deglaze the pan. (Deglaze means to bring up all those delicious cooked bits of chicken that are stuck to the bottom of the pan from the searing) Let reduce just a little bit.

  7. Add 1 cup heavy cream, some fresh thyme leaves, a small handful of chopped parsley, and some grated asiago cheese. Stir well and remove the pan from the burner. Taste the sauce. You shouldn't need to add any salt because the cheese is salty. If you want to add some pepper, do so now.

  8. Pour over the pasta and toss. Plate the pasta and put a thigh or two on top. Spoon a little bit of that fat that's in the baking dish on top of the chicken and if you want to make it pretty like my picture, put a sprig of thyme and a piece of garlic on top.

  9. Enjoy! I served this dish with some roasted asparagus. It paired perfectly with the chicken and pasta.

Friday, July 8, 2011

.bang bang shrimp.


Have you ever had one of those nights when you just don't want to cook? This was one of those nights but I knew my husband would kill me if I suggested take out (again), plus he was working late and would be hungry when he got home.

I didn't want to slave for hours, nor did I have that kind of time, so I checked the pantry, freezers and fridge and found some ingredients I knew would work well together. The wonderful thing about this recipe, is that it is QUICK! You can have this made in 30 minutes - no joke.

Here's the list of ingredients I used:


  • Shrimp

  • Garlic

  • Gingerroot (not dried ginger you use in baking)

  • Red bell pepper

  • Green onion

  • Cilantro

  • Chili oil

  • Oil

  • Red pepper flakes

  • Coconut milk

  • Fish sauce

  • Soy sauce

  • Sugar


How to prepare:


While the shrimp are thawing in the water, put 2 cups rice in a medium pot with 3 1/2 cups water. Cover with a lid and put on to boil. When it comes to a boil, reduce the heat to simmer and set the timer for 20 minutes.


Once the shrimp are thawed, drain well and pat dry with paper towels. The shrimp I use are not small but not huge. I also buy deveined shrimp that have the shell on, but for this recipe, I took off all the shells except for the tail because I just like how it looks. ;)


-Mince 2 cloves garlic and grate 1 tsp fresh gingerroot.

-Slice up one red bell pepper

-Slice 1 1/2 bunches of green onion on the diagonal (slicing on the diagonal makes it look fancy!)

-Roughly chop some cilantro


Heat a skillet or a wok. I use a wok but use what you have. When hot, add 2-3 Tbsp oil and a couple shakes of chili oil. I went a little too crazy with the chili oil which resulted in a pretty spicy dish, so I'm warning you, if you don't want this too hot, use just a little oil, or omit it altogether.


Add the ginger and garlic and saute for 30 seconds to release their fragrance. Add the red bell pepper and saute for a couple minutes. Then add the green onion, shrimp, and a shake or two of red pepper flakes. Saute until the shrimp start going from translucent to opaque. This doesn't take very long and we want to take care not to overcook the shrimp. Overcooked shrimp = tough and chewy = UNDESIRABLE!


When the shrimp are halfway cooked through, add 1/2 can of coconut milk, 1 Tbsp fish sauce, 1 Tbsp soy sauce, 1 tsp sugar, and a handful of chopped cilantro. Cook for another couple minutes until the shrimp are finished.


By this point, the rice should be done. Spoon rice into a bowl and then scoop shrimp, veggies, and sauce over the rice.


A wonderfully fragrant, sweet and spicy dish that is sure to satisfy any craving for Thai/Indonesian food. And the great thing about this dish is that it's not only delicious, but it's easy and quick to make! You can't beat that. Enjoy!

Tuesday, July 5, 2011

Alright...

I know I've been missing in action but you didn't need to send Chuck Norris after me with his wicked ninja skills..


So... Happy day after the 4th, everyone! I'd like to tell you I was really busy and that's what kept me away, but to be honest, I was suffering major burn out. Felt like I didn't need to have a food blog anymore because everyone and their DOG seems to have a food blog right now and I didn't feel I had anything special happening here.

Thank you to those of you who have contacted me begging me to come back. Your words and well wishes meant a lot (they still do) and here I am, ready to fight the good food fight. If you're a fan of this blog, let me know! It really keeps me motivated when I know there are people out there reading, making my recipes, and ENJOYING them!


Before I share a couple new recipes, I want to give you some breaking news: I'm moving my blog. The layout of Creating Post it Notes is boring me and I'm looking for something a little better. It's not going to happen overnight but within the next few weeks, I'll be moving my recipes to my new home. A whole new facelift and I can't wait to get it up and running.


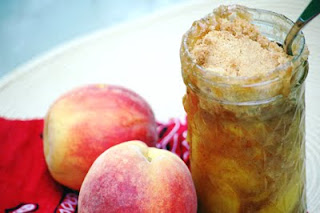
For our 4th of July, Jim, the girls, and I went to West Point Military Academy to enjoy the festivities. I packed a picnic dinner of BBQ Chicken Salad, homemade bread, fruit salsa w/ cinnamon tortilla chips, watermelon slushes, and for dessert? Peach cobbler in jars for easy transportation. De-LICIOUS!


BBQ CHICKEN SALAD


This salad is so quick and easy to make. I normally grill up chicken and cut up, but I was running short on time and used Tyson Chicken Strips, slathered them with BBQ sauce, and baked them in the oven.


Here's a list of ingredients I use:


  • Iceberg and red leaf lettuces (you can use any kind you want)

  • Shredded cheese

  • Grated carrots

  • Roasted corn, cut from the cob

  • Red onion, sliced

  • Cucumber, peeled and sliced

  • Bacon (chopped into bits)

  • Black beans, drained and rinsed

  • Tomato, diced

  • BBQ Chicken, chopped up

For the dressing, I made ranch dressing (from the packet *gasp*) and added a little BBQ sauce (use whatever kind you like), cilantro, and a squeeze of lime. So quick and easy, but so delicious.


Did I mention I made peach cobbler in Ball jars???? These were *perfect* for our picnic. Baked in individual jars so all I had to do was pass them around and we were good to go. See how good these look?


Maybe a little closer????


And just a little closer. I am going to make these for my next big BBQ but I'm going to use the short Ball jars. Guests can stop on by and pick one up, maybe put a scoop of vanilla bean ice cream on top and walk away. It can't get more perfect than that.


And to finish this post - WATERMELON SLUSHES!!!! This drink is perfect on a warm summer night. Or if you had a party and have a lot of watermelon leftover and you don't want it to go to waste... use it for this drink!


Take a watermelon and chop up the center flesh. Put it in a blender and puree. Mix in a couple tablespoons of sugar. I didn't add very much because watermelon is already super sweet and I don't like sickeningly sweet drinks.


Pour the puree in a 9x13 pan and put in the freezer. Stir every hour or every two hours until you have the perfect watermelon slush. Spoon into glasses and pour ginger ale on top. Garnish with a sprig of mint. *OR* if you're looking for something a little more grown up, you can add vodka, tequila, or rum - whichever poison you prefer.


My watermelon lover was all over this drink. Enjoy!