Thursday, April 23, 2009

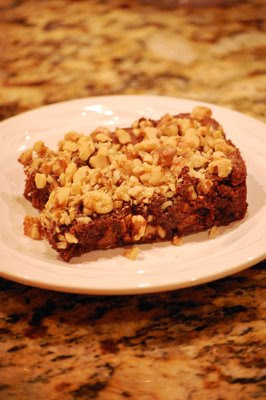
.brownies to die for.


Last night my husband wanted brownies. I usually make these cakey brownies that are a lot like Texas sheet cake. Okay.. it is Texas sheet cake, but we don't call it that. He wanted rich, gooey, chewy brownies that lull you into sweet chocolate dreams. It sounded pretty good to me!

I remember I have a specialty cookbook called Chocolate. That's it. Chocolate. There are recipes for brownies, cookies, cupcakes, cakes... all devoted to my obsession. :) So I peeked in there for the perfect brownie recipe and found it.

The nice thing about this recipe too is that you dirty one dish -- a large saucepan.. minus the brownie pan you actually bake these guys in.


First you need to take 3/4 cups butter (1 1/2 sticks) and put in a saucepan over medium heat and melt completely. Turn off the burner and remove the pan from the heat.


When it's melted, add 2/3 cup cocoa powder. Mix well.


Next, measure out 1 2/3 c. sugar and add that, and 1/2 tsp salt to the pan and whisk in. It'll get really thick, but that's okay.


Whisk in 2 eggs and 1 1/2 tsp vanilla just until it's all mixed in. Don't over beat.


Sprinkle in 1 cup flour. Use a spatula to mix it all together and not the whisk. I tried it with the whisk and it was so thick it took forever to knock it all out from the middle. So learn from me... use a spatula.


Add 3/4 chocolate chips. You can use semi sweet, milk, or white chocolate chips. I'm not fussy... but I used plain ol semi sweet.


Chop 1 to 1 1/2 cups walnuts or pecans.


Spray an 8x8 baking pan with Pam and dump in the brownie batter. Spread out evenly.


Sprinkle enough chopped nuts on top to cover the surface. Pop in a 350* oven and bake for 30-35 minutes. When you insert a toothpick in the center, it should come out a little gooey on the stick. You don't want to overbake because then it won't be a moist, chewy brownie.
Remove from the oven and let it cool completely. Again.. trust me when I say let it cool. I didn't and when I cut into it, it was too gooey and wouldn't hold it's shape.
These were sinful and decadent. I could hardly eat even one of these they were so rich. So sit down and enjoy these with a tall cold glass of milk.
Printable version:

Wednesday, April 22, 2009

.grilled swordfish w/ bacon.


I've been looking at making meals that are healthier, and quicker to make for my family. Granted, this has bacon on it, but you can opt out and use turkey bacon, or pancetta. In fact, this dish is inspired by an italian one I saw Giada De Laurentis make the other day called Swordfish Spiedini and she used pancetta, which is traditional.


I, however, did not have pancetta, so I used the next best thing. Bacon. Everything's better with bacon on it, right?


Start by rinsing and patting dry one swordfish steak. If the fish smells bad or is slimy at all, do not use. Cut into bite sized cubes.


Put in a bowl and drizzle lightly with extra virgin olive oil. Also add about 1/2 tsp basil and oregano. Season with salt and pepper and 2 Tbsp lemon juice, or the juice of one fresh lemon.

I let this marinade for about 15 minutes, but if you want to let this sit overnight, it'll taste even better.


Put the swordfish on skewers (if you're grilling outside, make sure you soak the bamboo skewers for at least 30 minutes. This will keep them from burning up.

Take a slice of bacon and skewer it at the bottom, wrap around, then attach to the top of the skewer to keep it in place.


Place the skewers on the grill and sear on each side for 2-3 minutes. It will take 10-12 minutes for these to cook all the way through.


Look how delicious these are. The meat of the swordfish will be firm and opaque, and the bacon will be beautifully crispened on the outside.

The flavor of the swordfish is out of this world. I served it with some parmesan orzo and veggie.

You can have this on your table in 30 minutes flat. So quick, easy, and delicious. Bon appetit!
Printable version:

Tuesday, April 14, 2009

.pan seared duck with sesame ginger glaze.


Have you ever felt uninspired? Lately I've been feeling that way and then compound it with Spring Break and a husband working wonky hours.... well.. it's enough to drive me crazy.


I hope everyone had a great Easter. It was a crazy busy weekend for us, and since we had no special plans, our big dinner got put off until Monday. I made pan seared duck breast with a sesame ginger glaze, roasted fingerling potatoes, salad, and rolls. I was going to make a coconut mousse cake, but we still had brownies left and I decided not to make the cake until later this week. (I can't wait!)


I looked everywhere for 2 weeks for duck breast. Virtually impossible to find!!! My good friend, Deb was over here last week for scrapbooking and lunch and she mentioned a shop over near her home that had specialty type meats so I called and yesss they had some! So I had the husband pick it up on his way home from work on Friday. Two breasts cost me $20! Yikes. I think I might take up duck hunting in the very near future because this turned out amazing. Paige (my 7 yr old) loved it so much and told me I had to make it again soon. (I'm thinking I might make roast duck lo mein. mmmm)


This is a very easy dish to make. It's uncomplicated, which is refreshing when it comes to a holiday meal.


First, in a saucepan you need to put the glaze ingredients.


1/4 cup water
1 tsp cornstarch
1/3 cup sugar
1/3 cup rice wine vinegar
1/4 cup soy sauce
1 tsp grated ginger
1 tsp sesame oil
1/2 tsp sesame seeds
1/4 tsp minced garlic
1 dash red pepper flakes


Bring to a boil until it thickens. Set aside. This can be made days in advance and held in the fridge. I made some last week to have with lettuce wraps and sealed it in a ziploc and tossed into the freezer. All I had to do was pull it out and heat. Perfect!


Heat a little olive oil in a skillet with a couple cloves of peeled and crushed garlic. Sear each side of the duck breast for 4-5 minutes, starting with the fat side down. Use a spoon to continually spoon some of the fat over the top of each breast as it cooks. Pull from the pan and put in a baking dish. Pour some glaze on top of the duck and put in a 400* oven for 10 minutes.


Serve with rice or potatoes, salad, and bread.


Printable version:
http://docs.google.com/Doc?docid=0AZ-Z_fQXybIkZGcydmZqcW1fMTY0azc1ems5ZDY&hl=en

Wednesday, April 8, 2009

.strawberry wontons.


Today was a great day. I invited a couple girlfriends over for lunch and for scrapbooking. I met them over at 2Peas, and while I have gotten together with Deb quite a few times, I have only had email conversations with Denise. I had planned on making Santa Fe Chicken Salad for lunch, but while grocery shopping yesterday, I had a sudden craving for lettuce wraps.....


... and crab rangoon... (weak)


For dessert, I decided to make some deep fried strawberry wontons. What is a strawberry wonton, you ask? Oh my.... well, let me show you what it is!

In a bowl (this bowl looks really small in the picture, but it's not) mix together 1 (8oz) pkg cream cheese, 1/4 cup sugar, 1 tsp vanilla, a dash cinnamon, and about 1 cup finely diced strawberries.

While munching on these, we all decided that any kind of berry would be awesome in these. Raspberries. Blackberries.... we really aren't particular. They were so delicious!


Take won ton wrappers (usually found by the tofu products in your grocery store) and lay as many out as you need. This recipe will make almost 2 dozen. Spoon a little filling in the middle of each wrapper.

Crack open an egg and separate. We need the egg whites to act as glue.


Dip your finger in the egg white, and run it around all four sides of the won ton wrapper. Place another won ton wrapper on top and seal the edges well. Put a dab of egg white on the corners and then pinch the corners together (as seen in the picture).


Repeat until you've made all the filled won tons. Put them on a plate and stick in the freezer. You want to firm up the filling a bit before frying otherwise it will ooze out into your oil.


Heat your oil in a pot or wok to 350* F. Carefully add each won ton and fry until golden brown. Let drain well on paper towels.

Drizzle the tops with chocolate ganache (or you can use Hershey's syrup) and put a dollop of whipped cream on the side.

Serve warm (my friends said they're still pretty tasty cold too).
Printable version:

Sunday, April 5, 2009

.easter nests.


I love Easter time!  Like I said in a previous entry, I was going to make various Easter type treats and dishes to inspire you in the kitchen this holiday.  We only have one week left!


Today, Paige and I made these sweet little chocolate rice krispy nests.  They were so much fun and if you've got kids in the house who like to get creative in the kitchen, you must make these with them.  Quick, easy, and super yummy.

In a pot, melt 1/4 cup butter over low heat.  Add 1 bag (10 oz) marshmallows and stir until they're all melted.  Make sure you or your child keeps stirring so the marshmallows don't burn in the pan.  Nobody likes a burnt rice krispy treat.  Ick.


When the marshmallows have melted, add 5 cups rice krispies.  Stir well to make sure everything's coated.


Put 1 cup chocolate chips in a bowl.  Pop in the microwave for 1 minute and then stir to make sure they're all melted.


Scoop the melted chocolate into the pan and stir.  This will give the nests a "dirty" look.  I suppose if you wanted to skip this step you could.. or you could even use cocoa krispies instead of regular.   I like it this way because it gives the krispy nest more firmness and isn't so wimpy and sticky.


Put cupcake liners in a muffin pan.


Spoon a good amount of rice krispies into each muffin cup.  Use your fingers or some other kind of tool to dent in the center.  I had Paige use this Pampered Chef tool that I sprayed with Pam (so it wouldn't stick).


As you can see, we had to sneak a few bites which left us short 1 nest.  (oops) This recipe will make a full dozen though if you can exercise enough self control. 


Put 1/2 cup shredded coconut in a ziploc and put a small bit of green food coloring in.  If you use the Wilton gel type coloring, stick a toothpick into the color and then into the coconut.  That's all you'll need because we don't want glow in the dark green.  We just want to barely tint the coconut to make it look like light colored grass.


Put a little coconut grass in the middle where the indentation is.


The final step is to put some M&Ms or those candy malted robin's eggs in the middle.  We used M&Ms with almonds that were the Easter pastel.  One green, pink, yellow, blue, and purple egg.  What a full nest for a little birdie!


.salmon dill eggs benedict.


With my husband working nights (he goes back to days this week! WAHOO!!!) I have felt so guilty because he doesn't get nearly as many homecooked meals because he has to go in so early.  One of his favorite things is eggs benedict.  When we were first married, we would always hit this awesome brunch buffet at this nice hotel by our home on  the weekend.    Eggs benedict would be the first thing on his plate.  So the other day I thought I would surprise him by making this for him.  He loved it!

Eggs benedict is usually made with a toasted english muffin, a slice of canadian bacon, a poached egg, and hollandaise sauce.  Mine is made with the english muffin, a slice of smoked salmon, poached egg, and a dill hollandaise sauce.  Yummy. If you're looking for something new to make for breakfast this coming Easter Sunday, you should try this!

Hollandaise sauce is a rich, egg sauce.  Not difficult to make.  First you need to cut up 4 Tbsp butter and set to the side.


In a bowl put 3 egg yolks, 1 Tbsp water, 1 Tbsp lemon juice, a dash pepper, and 1 pat of butter.  Put over a pot of boiling water in a double boiler method.  Stir with a rubber spatula consistently so the eggs don't turn into scrambled eggs.  When the pat of butter melts, add another pat and repeat until all the butter has been incorporated.  By this time, the eggs should start cooking and thickening the sauce.  When it's thick and coats the spatula, remove from the top of the pot.


Add some fresh chopped dill (or dried dill) (about 1/2 tsp).


This is the smoked salmon I used.  It's usually found in the deli section of your grocery store.  Do not buy the kind down the tuna aisle.  It's not the same kind.


Now we need to poach the eggs.  Poaching means to let the egg cook in water or steam.  An easy way to do this is to first break an egg into a bowl and then pour into a skillet of hot water.


Repeat.  I made 3 eggs... you keep adding for however many you're making this for.  Let poach for 3 minutes.

Use a serrated spoon to scoop from the water. 

Plate everything and serve with fruit and sausage or bacon.


Printable version:

Wednesday, April 1, 2009

.spicy mango shrimp.


Happy April Fools!  I thought about pulling a joke on you all, but voted against it.  Instead, I decided to post another recipe. :)

I have to tell you about my oldest daughter, Paige.  She LOVES shrimp.  She could eat it every day for the rest of her life.  Okay, maybe not.  She'd probably want to throw crab in there too.  She's only 7 and loves crab, shrimp, lobster.... that's my girl!  Such a refined palate.   This was her choice of dinner the other night.  She was a little concerned about the spice, but I only put a little red chili  pepper in and it was good.  Both she and Perry snarfed their meal!!  I was impressed.

This dish is SO easy and fast.  You can have it made and on the table in 30 minutes flat.  Really!  Let me show you.


You're going to need the following:

2 Tbsp honey, 1/4 cup olive oil, half of one mango (save the other half for grilling), 2 tsp grated gingerroot, 1/4 cup lime juice, 1 tsp red thai curry paste (not pictured), and some red chili flakes.  

You can adjust how hot you want this.  If you don't want any heat, leave the flakes out entirely.  Put a few in.  Don't be scared.  It won't be hot, but it will give the sauce a little kick that gives the shrimp a real "wow" factor.  If you want them really hot, dump more pepper flakes in.

Put those ingredients in a blender and puree till smooth.  Transfer to a bowl.


Because of Paige's great love for shrimp, I keep a humongous bag in my freezer.  These thaw so easily and quick by running them under the faucet.  Don't use hot water, but around room temp.   

I buy the peeled and deveined shrimp.. however the last time I was at the store, the only ones I could find still had the shell so if yours have shells.. peel them off.  

Skewer those babies up and get them ready for cooking.


Once they're on skewers, brush both sides liberally with the mango sauce.


Put them on a hot grill, or grill pan and let them sear on each side.  You want some nice grill markings on these but don't let them cook too long or else they'll become rubbery and hard.  

What I did was grill for about a minute on one side, flip.  While it was cooking the other side, I basted with more sauce, flipped and basted the other side, then flipped one last time (so they cooked 2x on each side)

As you can see, I also grilled slices of the mango.  When you grill fruit, it changes the flavor a little because the heat draws out some of the sugars, and the heat caramelizes it a little.  So delicious.


When your shrimp have cooked, pull from the grill and serve!  I made some couscous to go on the side and was a perfect compliment to the shrimp.

So next time you're in a hurry for dinner, think about this dish for your family.  It's sure to be a winner!


Printable version: