Showing posts with label bacon. Show all posts

Wednesday, April 22, 2009

.grilled swordfish w/ bacon.


I've been looking at making meals that are healthier, and quicker to make for my family. Granted, this has bacon on it, but you can opt out and use turkey bacon, or pancetta. In fact, this dish is inspired by an italian one I saw Giada De Laurentis make the other day called Swordfish Spiedini and she used pancetta, which is traditional.


I, however, did not have pancetta, so I used the next best thing. Bacon. Everything's better with bacon on it, right?


Start by rinsing and patting dry one swordfish steak. If the fish smells bad or is slimy at all, do not use. Cut into bite sized cubes.


Put in a bowl and drizzle lightly with extra virgin olive oil. Also add about 1/2 tsp basil and oregano. Season with salt and pepper and 2 Tbsp lemon juice, or the juice of one fresh lemon.

I let this marinade for about 15 minutes, but if you want to let this sit overnight, it'll taste even better.


Put the swordfish on skewers (if you're grilling outside, make sure you soak the bamboo skewers for at least 30 minutes. This will keep them from burning up.

Take a slice of bacon and skewer it at the bottom, wrap around, then attach to the top of the skewer to keep it in place.


Place the skewers on the grill and sear on each side for 2-3 minutes. It will take 10-12 minutes for these to cook all the way through.


Look how delicious these are. The meat of the swordfish will be firm and opaque, and the bacon will be beautifully crispened on the outside.

The flavor of the swordfish is out of this world. I served it with some parmesan orzo and veggie.

You can have this on your table in 30 minutes flat. So quick, easy, and delicious. Bon appetit!
Printable version:

Monday, February 9, 2009

.spinach salad w/ blue cheese and walnuts.


This is the spinach salad for our Valentine dinner cook-along. I love a good salad and this one definitely hits the spot. You want to make sure you use really good ingredients. Make sure your blue cheese is a good brand with nice veining throughout the wedge. You won't need much because it's such a pungent cheese, so don't buy more than you think you'll use. If you aren't a fan of blue cheese, you can sub with parmesan. My daughter had cheddar on her salad.

I made this with a warm bacon shallot vinaigrette. The sweet and sour dressing was a perfect compliment to the creamy cheese and nutty flavor of the walnuts.


Slice two shallots.


Chop up two strips of bacon. I used thick sliced bacon.


Put the bacon in a skillet. Fry over medium high heat.


When the bacon is halfway done, add the shallots and let saute for 3-4 minutes.


Add 1/4 cup apple cider vinegar. If you find there isn't a lot of "dressing", add a little olive oil.

Season with 1/2 tsp sugar, salt, and pepper. If it's too sour, add more sugar. If it's too sweet, add more vinegar.

That is all this is needed for the dressing. I transferred to a bowl and kept in a low temp oven.


Slice some of the blue cheese and break into pieces.
I used one of those pre-packages of spinach that you can find in your produce section. I like these because the spinach is already washed.
Make the viniagrette a day in advance. It will save you a lot of time. Reheat in the microwave just before serving. You can also toast the chopped walnuts the night before too. Trust me. Do as much as possible before hand so you aren't killing yourself in the kitchen.
To plate: Tear some of the spinach on top of a plate. Sprinkle around some blue cheese and walnuts. Spoon the bacon-shallot vinaigrette over the top. Serve immediately.
Printable version:

Wednesday, August 27, 2008

.clam chowder.


I have found that people either LOVE clam chowder, or they hate it with a passion. My sister, Marcia, doesn't like clam chowder, but she does like my chowder. It's that good. ;) The nice thing about soup is you can usually have it made and ready to eat within an hour. This recipe is just that and it is good.

I made cheddar muffins to go with them. Delicious. I added garlic powder to the recipe to give them a little more flavor and I cut back on the cheese. Yep... these will be a staple I think. If you are one of those people who is unsure about clam chowder, try this recipe. Maybe you'll become a convert. :)


Chop up one medium sized onion. (abt 1 cup)


Chop up 3 stalks of celery. (abt 1 cup)


Cut up 3 slices bacon.


Peel and cut into bite sized pieces, 6 white or yukon gold potatoes (abt 2 cups).


In a large soup pot, cook the bacon until halfway done. Add the potatoes, celery, and onion. Stir to coat the veggies.


Cook over medium heat until the potatoes start getting a glossy look, and the onions are almost translucent.


Add 4 cups chicken stock. You can probably see some large things in this picture. I didn't give my chicken stock time to thaw (I had some frozen) so I just stuck the whole thing in. Cover the pot with a lid and let cook for about 20 minutes. You need to cook it long enough for the potatoes to cook through.

Make sure you season well with salt and pepper.


In a bowl, put 2 cups milk and 1/4 cup flour.


Pour into the soup pot. If your flour/milk is lumpy, pour it through a sieve first. Kick the heat up a little so this will thicken. Once thick, remove from the heat.


You will need two cans minced clams. I like minced more than the regular because you don't get these huge pieces. It distributes better too when they're smaller. Drain the cans and add to the soup once it's thickened.


Add 1 Tbsp basil. Taste and reseason with salt and pepper. Let sit, covered, for another 5 minutes off the heat before serving. Enjoy!


Printable version:
http://docs.google.com/Doc?id=dg2vfjqm_102dfcqj89v

Sunday, July 6, 2008

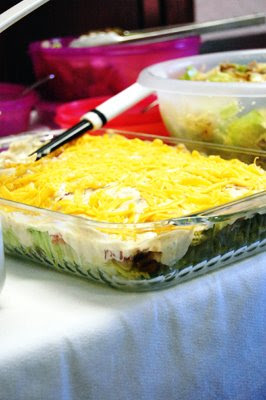
.layered salad.

I had mentioned in my previous entry that I would post the recipe for my warm potato salad, but after looking over the images on my computer, I'm missing a lot of the steps because I was in such a hurry to get things done before the wedding.

I did get all the steps for this though. We can always count on my sister, Ronda to bring this salad to our family dinners. It's a favorite and so fast to make.


Chop one head of iceberg lettuce and put in a casserole dish.
Dice 2 roma tomatoes and sprinkle on top.
Chop some green onion and put on top of the tomatoes.
Open a can of sliced water chestnuts.
Carefully arrange on top of the salad. You want to make sure you'll get some with every bite.
Cut up some bacon and fry it. You will only need half of what you see here. I used the other half for my potato salad.
You're going to need about 1 cup of peas too. If you make this salad up ahead of time (like the night before or a few hours before), you can leave them frozen. If you plan on serving the salad immediately, then thaw these by putting them in a sieve and running under cold water.
Sprinkle the top with the bacon and peas.
In a bowl, put 1 1/2 cups mayonnaise, 1/2 tsp paprika, 1 tsp sugar, and 1 tsp lemon juice.
Put globs of it on top of the salad and then use a spatula to spread it over the entire surface. This seals in the salad underneath and keeps it fresh.
Grate some cheddar cheese and sprinkle it on top. This salad can be made the night before you need it. It holds up really well.

Sunday, June 8, 2008

.apple, bacon, and cheddar quiche.


I like quiche. Jim likes it too. Who says real men don't eat quiche? Whoever said that has no clue what they're talking about.
I feel like my life has slowly spun out of control. Last weekend I had the wedding. This weekend we had a yard sale. And this week and next weekend we're putting hardwood floors in our kitchen and entryway. I. am. insane.

Did I mention I am helping with a luncheon at church this Tuesday and planning a baby shower for a girlfriend? Mmm hmm. Out. of. control!!!!!

Since we were busy with the yard sale this weekend, I didn't have a ton of energy to fix fussy meals. Quiche is a great dish because it's not difficult to whip up.

If you're afraid of making your own crust, go on and buy them frozen or whatever. I can't stand them because the taste is "off" for me, but I understand that not everyone is confident making their own.

I, however, do make my crusts from scratch. Been doing it for so long now, I can get one whipped out in 5 minutes. In fact, over Christmas, my parents were here visiting and had to run to the drug store. In the time they were gone (approx. 1/2 hr), I made an apple pie and had it in the oven, cleaned up my mess, and started the dough for the rolls. Suffice it to say, the master pie baker (my dad) was impressed. :

For a single pie crust, I use:
1 1/3 c. flour
1/2 tsp salt
1/2 cup shortening or butter
ice water

Mix together the flour and salt in a bowl. Cut in the shortening until nice and crumbly. Spoon in some ice water and fluff with a fork until the dough starts pulling together. Use ice water so it keeps the dough cold. Cold dough=flaky crust.


Roll out and put in a deep dish pie plate. Trim edges and tuck under.


Crimp the edges.


In a bowl, crack open one dozen eggs. Slightly mix with fork. Don't overmix, because it will break down the protein.


Add 1/4 cup milk. (I eyeball it.)


Cut up about 4-5 strips of bacon and fry. I keep my bacon frozen because it makes it easier to chop. But it's virtually impossible to pull the slices apart, so I just cut strips off.


Grate a cup or two of cheddar cheese.


Peel, core, and dice one granny smith apple.


I know what you're thinking. Bacon, cheese AND apple??? It really pairs well. It adds a little sweetness and texture to the quiche. It's quite wonderful.


Season the egg/milk with some salt and pepper, and garlic powder (1 tsp).


Add all of the cooked bacon, grated cheese, and diced apple. Mix in with a fork.


Pour the egg into the pie shell.
Put in a 325* oven and bake for an hour or until the center is completely set and a toothpick inserted comes out clean.


The edges of the crust will be nice and golden and the top will be browned nicely. It will also be slightly puffed up when it's done. Slice up and eat warm with some fresh fruit. Absolutely scrumptious!!

Printable version:
http://docs.google.com/Doc?id=dg2vfjqm_65hrhk9kf8

Friday, May 16, 2008

.jalapeno poppers.


I really like jalapeno poppers. I normally buy them in the freezer department at the store, but I thought I might take a stab at making them myself. Honestly.. how hard could it be? It really isn't very hard, and now that I've made them once, I can see me making them again and perhaps even sealing them in the food sealer and freezing for future use. I think that's a great idea!


I cut the tops off the peppers first. 8 cute little jalapeno peppers all in a row. :)
I bought ones that are as long as my finger. You could probably get away with using smaller ones if you can't find big ones.


Using a paring knife, run it in a circular fashion to cut out the pith and seeds. The pith is where the heat is. A lot of people think it's the seeds, but it's really not. If you like your peppers hotter, save the insides and chop them up to put in the cream cheese filling. These were already hot enough for me... whew. My mouth was on fire! LOL


In a mixing bowl, beat together 1 8oz package cream cheese and 1 cup finely shredded cheddar cheese.


Take 1 strip of bacon, cut into pieces and fry.
Remove from the pan. Let sit on paper towels for a few.


After they sit for a bit, put them on a cutting board and with your knife, cut them into bits.


Mix the bacon in with the cream cheese/cheese mixture.


Fill the cavities of the peppers with the cream cheese mix. Having made these now, I would probably use a piping bag to fill these. It was messy and difficult getting the peppers filled all the way to the bottom.


Ta-da! Stuffed peppers.


Now you want to get three pie plates or bowls ready. In one, put some buttermilk. You could use milk, but it's awfully thin and it won't coat the peppers as well, thus leading to issues with full coverage with the breading.


Next roll them in a bowl of flour. Make sure you coat the flat top where you put the cheese. :)


Now let the peppers sit for 5 minutes to really make sure the flour is stuck on good to those jalapenos.


Re-dip the peppers in the buttermilk and then put in the bowl of plain breadcrumbs. Make sure you coat all the sides (and ends) well.


When it's all said and done you wind up with lovely coated.... fingers. Ick. It's a messy job but someone has to do it. :D


Here we have all the peppers coated. Aren't they pretty??


Heat a pot or wok or fry daddy of oil to 350*. I used a really long serated spoon to carefully lower each pepper into the hot oil. Fry these babies, turning over after they cook on one side for a minute or two. You want beautiful golden color all the way around the popper.
Once you feel they're done, pull from the oil and let drain on a paper towel for about 4-5 minutes. Transfer the peppers to a plate and serve with ranch dressing.

Chef's notes: The peppers were still pretty crunchy after they were fried. I think next time I make them, I will blanch the peppers first (blanch means to cook in a pot of boiling water for a few minutes, and then pulling out and putting immediately in a bowl of ice water to "shock" the color into the veggie, and also to stop the cooking process). Did I mention these were really spicy? My poor little lips!!! And I normally like spicy food. I guess I didn't clean out the pith well enough!

Printable version:
http://docs.google.com/Doc?id=dg2vfjqm_57d3g2kh3t