

Now before you turn your nose up and close the browser, I want you to give zucchini a chance. You don't taste it and it provides not only nutrients to your bread, it makes it moist and delicious!
I've been making this recipe for years now and it's one of my favorites. I'm sure it will become one of your favorites, as well.
This recipe makes 2 loaves, or about 1 dozen large, Texas sized muffins. (Those are the kinds of muffins we made at my bakery -- we like em big!)
In a large mixing bowl, combine:
1 cup sugar
1 cup brown sugar
3 cups flour
1 Tbsp baking soda
1 tsp baking powder
1 tsp salt
1 tsp cinnamon
In another bowl, mix together:
3 eggs, beaten
1 Tbsp vanilla
1 cup oil (you can substitute applesauce, if you like)
2 1/2 cups grated zucchini
1/2 bag mini chocolate chips
Dump all the wet ingredients into the dry and mix using a fork just until the dry ingredients are slightly wet. Don't overmix.
Spoon into prepared bread or muffin pans and pop in a 375* oven and bake 10 minutes. Reduce the heat to 350* and continue baking until a toothpick inserted comes out clean.
Trust me... you're going to love this bread! (you can thank me later. ;) )
Wednesday, April 4, 2012
.chocolate zucchini bread.
Saturday, August 20, 2011
.chocolate cream pie.

We were in Ohio visiting my husband's family last month and while we were away, my friend came over to our house every day to check on our cat and feed her for us. To thank her, I made her favorite pie: Chocolate Cream Pie!
Friday, February 19, 2010
Valentine's Day Dinner
A couple of weeks ago, I had a last minute opportunity to attend the US Bocuse d'Or final at The Culinary Institute of America. Twelve teams fought to be the US representative at the main Bocuse d'Or competition in Lyon, France January 2011.
Chef Thomas Keller, is the President of the US Bocuse d'Or organization and while there I was able to get him to sign my copy of The French Laundry cookbook! (Awesome!)
Anyway.... Part of my Valentine menu was inspired by a recipe in that book and the beef broth I made, *did* come from his instructions and it took all stinking day to make. That's okay though. The flavor of that stock was A-MAZING!!!
 Competition floor
Chef Daniel Boulud introducting some of the judges
 One of the presentation trays as it passes the judges -- (thank you zoom lens for having the capability to get these shots from my seat in the bleachers!)
At church, we can sign up to feed the missionaries who are serving full-time. Right now, we have the cutest, SWEETEST Sister Missionaries that I just love so when I saw that they didn't have plans on the calendar for Valentine's Day (except church), I put my name down and got to scheming. I like to make food they normally don't get every day and for this holiday, I wanted to make it extra special and extra delicious!
Dinner was served in 3 courses -
 {Course #1}
Sweetheart Salad w/ Goat Cheese Croquette & Sweet Potato w/ Rosemary Rolls
I made my roll dough like normal but before adding the flour and salt, I stirred in 1 cup mashed sweet potatoes and 1 Tbsp rosemary. A little extra flour is necessary due to the moistness of the sweet potatoes, but if you gauge it by how the dough pulls together, you'll have just the right amount. I loved how savory these were. Delicious.
The salad was in a parmesan bowl that I made, but I didn't keep them in the oven long enough and they flattened out. They were so delicious with this salad! What I did was use my silpat and sprinkled two semi large circles on the mat (on a cookie sheet) and popped into a 400* oven. Let it melt until nice and golden brown. Remove and let sit for a few minutes so the cheese is cool enough to handle. Slowly pull the cheese up and off the Silpat and place over an upside down bowl. Allow the cheese to cool and harden completely.
My "sweetheart" salad had mini hearts cut out of a red bell pepper, I did a zigzag cut around radishes and when pulled apart, they look like little flowers, I curled green onion sprigs by slicing the chive part and then popping in a bowl of ice water for 30 minutes. Grated carrots, sliced cucumbers, and topped with a goat cheese croquette.
To make the croquette, I cut semi-thick slices off a goat cheese log. Dipped each slice in egg wash (1 egg white + 1 Tbsp water) and then into a bowl of crushed Panko breadcrumbs.
Place all the pieces on a plate and put in the freezer for about 15-20 minutes. Heat a little oil in a small saucepan and carefully put each croquette in to fry. When golden brown on both sides, remove and sit on a paper towel to drain. Put on top of the salad. This ooey, gooey warm bit of goodness is pure heaven!
 {Course 2}
Thursday, April 23, 2009
.brownies to die for.
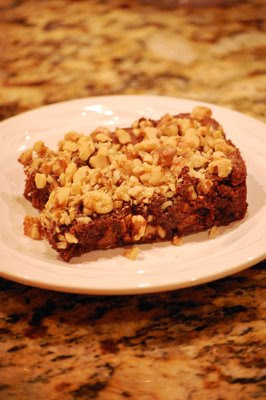
Last night my husband wanted brownies. I usually make these cakey brownies that are a lot like Texas sheet cake. Okay.. it is Texas sheet cake, but we don't call it that. He wanted rich, gooey, chewy brownies that lull you into sweet chocolate dreams. It sounded pretty good to me!
I remember I have a specialty cookbook called Chocolate. That's it. Chocolate. There are recipes for brownies, cookies, cupcakes, cakes... all devoted to my obsession. :) So I peeked in there for the perfect brownie recipe and found it.
The nice thing about this recipe too is that you dirty one dish -- a large saucepan.. minus the brownie pan you actually bake these guys in.
First you need to take 3/4 cups butter (1 1/2 sticks) and put in a saucepan over medium heat and melt completely. Turn off the burner and remove the pan from the heat.
 When it's melted, add 2/3 cup cocoa powder. Mix well.
 Next, measure out 1 2/3 c. sugar and add that, and 1/2 tsp salt to the pan and whisk in. It'll get really thick, but that's okay.
 Whisk in 2 eggs and 1 1/2 tsp vanilla just until it's all mixed in. Don't over beat.
Sprinkle in 1 cup flour. Use a spatula to mix it all together and not the whisk. I tried it with the whisk and it was so thick it took forever to knock it all out from the middle. So learn from me... use a spatula.
 Add 3/4 chocolate chips. You can use semi sweet, milk, or white chocolate chips. I'm not fussy... but I used plain ol semi sweet.
 Chop 1 to 1 1/2 cups walnuts or pecans.
 Spray an 8x8 baking pan with Pam and dump in the brownie batter. Spread out evenly.
 Sprinkle enough chopped nuts on top to cover the surface. Pop in a 350* oven and bake for 30-35 minutes. When you insert a toothpick in the center, it should come out a little gooey on the stick. You don't want to overbake because then it won't be a moist, chewy brownie.
Thursday, February 12, 2009
.chocolate souffle.


 Put the egg yolks in a mixing bowl with 1/4 cup sugar. Whisk on high for 3 minutes. At that time, the yolks and sugar will be really pale and fluffy.
 Add 2 Tbsp flour and whisk again on high. The mixture will start thickening now. Make sure you scrape the sides of your mixing bowl to ensure everything is incorporated.


 Fold 1/3 of the egg whites into the chocolate. This will lighten up the base. Add the remaining whites and quickly fold in before they deflate. If there are striations in the batter, it's okay.
 After 15 minutes are up, pull these from the oven. Make sure when they're baking that you don't open the oven for any reason. The egg whites give the souffle the lift and bouyancy that make this dessert so spectacular and so indulgent.
Thursday, February 5, 2009
.chocolate french silk pie.

Have you ever had french silk pie? If you have, you'll be familiar with the delicious light, whipped filling that has a very delicate texture. Absolutely delicious. The chocolate is very subtle, unlike a chocolate cream pie. This is really just a chocolate mousse plopped on pie crust. What can be better than that?
This pie does call for raw egg, so if you have a problem with that, this might not be the pie for you. But trust me (trust me), you will not get food poisoning and you cannot taste the egg at all.
Before making the filling, you need to make a pie crust. When I started the pie crust, I took 3 eggs out of the fridge and sat out on the counter. You don't want to use really cold eggs, but rather you want eggs that have the chill taken off them. I have found if you take them out as you start the pie crust, they'll be out long enough to whip well.
For this recipe, make one single pie crust. Put in your pie plate, stab with a fork to create air holes, and stick in a 425* oven for 10-15 minutes.
You want the pie crust to be a little golden brown. Pull from the oven and allow to cool. You can make this pie crust the night before if you want.
While the pie crust is in the oven, you need to melt 3 ounces chocolate. The key to this recipe is good chocolate. Don't use Hershey's or Toll House. I'm talking gourmet chocolate here, people.
I broke off a piece of my Callebaut bar. It is some seriously good chocolate with out about 70% cocoa. It's a nice dark chocolate.
Melt over a double boiler on low heat. Don't get this too hot!
In a mixing bowl, put 1 softened stick (1/2 cup) butter and 3/4 cup sugar.
You really will want to use a hand mixer or stand mixer for this. You will KILL YOURSELF trying to whip this by hand and you won't get anywhere near the texture you need/want.
Cream the sugar and butter together for about 5 minutes on medium high speed. You need to make sure you let this whip until the sugar is no longer grainy. It needs to dissolve into the butter.
Add the melted chocolate and whip to incorporate. See how fluffy this is already becoming?
Add 1 tsp vanilla at this point too. Mix well.
Now, add one egg and whip whip whip on high. When it has been whipped and the sides scraped, add the second egg.
Again, whip whip whip on high. Each time you add an egg, it will get lighter and fluffier. Scrape the sides again.
Add the third egg and whip whip whip for the last time. By this point, you will have a beautiful silky mousse filling.
Here's a better shot of that filling. See how gorgeous that is? It's almost like chocolate whipped cream!
Scrape all of the filling into the cooled pie shell. Put in the fridge to sit while we make the whipped cream.
Thanks to the magic of the internet, voila. Sweetened whipped cream! Put the whip cream in a piping bag fitted with a star tip. Pipe whip cream around the edge of the pie and a little dollop in the center.
I used my vegetable peeler to shave off some chocolate off my Callebaut bar and sprinkled that on top.
Because this pie has egg in it, you will need to keep it in the fridge at all times. Probably not a good pie to serve at a hot summer pot luck outside. No no. Not good, unless you pull it directly from the fridge, serve, and put right back.
This pie is so very simple to make. Wow your family with this dessert tonight!
Printable version:
http://docs.google.com/Doc?id=dg2vfjqm_1312w8dkwdv
Friday, July 25, 2008
Move over Krispy Kreme.....

Can you believe in our little podunk town we don't have a donut shop? There used to be one but their donuts were really icky so they didn't last long. We didn't make donuts at the bakery because the building was not equipped with fryers or hoods, and we couldn't even outfit the place with them because the shop was protected by the historical society. Anyway.. we didn't have donuts.
I've never made them before either! I have known too many people who tried making them in the past only to have them burn their kitchens down. Yikes. Now that I know more about frying and what not, I know if your oil is too hot and you're not careful, that can happen! I used my wok to help keep my oil at a constant temperature where it is more difficult when using the stove.
Here's the recipe I used:


 I had my oil heated to about 370*. These don't take long to fry up. Carefully CAREFULLY place the donuts into the oil.
  When they're nice and golden on one side, flip them over so the otherside can cook. When both sides are golden, remove from the oil and let drain on paper towels. After you've done all the donuts, fry up those donut holes!

Printable version:
http://docs.google.com/Doc?id=dg2vfjqm_8263z5fdc3


